Mastering Aperture in Landscape Photography
Along with ISO and Shutter Speed, Aperture is one of the critical triumvirate of settings that photographers in any genre need to master. Understanding Aperture in Landscape photography is perhaps the hardest task as the effect of aperture on different lenses is so poorly documented.
For landscape photographers, amongst others, controlling the depth of field is one of the key creative decisions we take, so understanding aperture is of paramount importance!
Table of Contents
What is Aperture?
Aperture is the term used to describe the size of the opening in a lens through which light passes to reach the sensor. Making the aperture smaller reduces the amount of light reaching the sensor. Making the aperture larger (wider) increases the amount of light reaching the sensor.
From this description alone, it is obvious that a balance needs to be maintained between aperture, shutter speed (allowing more or less light into the sensor) and ISO (amplifying the signal after it reaches the sensor). In principle it is possible to achieve the same exposure with a number of different settings – but the picture will look different. It may exhibit a shallow depth of field if aperture has been used to increase the amount of light reaching the sensor or it may look blurred if shutter speed has been reduced to allow more light in.
Beyond achieving a ‘correct’ exposure, we can use these settings creatively to convey movement or to lead the viewers eye to the subject of the photograph.
How is Aperture Measured?
Aperture is measured in f-stops, this is a number that represents the ratio of the lens focal length to the diameter of the entrance pupil. We don’t need to worry too much about the detail other than to say that a small number equals a wide aperture; reducing the depth of field and allowing more light in, and a large number gives us a narrow aperture.
Full stop increments are f/1.8, f/2.8, f/4.0, f/5.6, f/8.0, f/11, f/16, f/22, f/32, f/64
In camera, f-stops often increment in 1/2 stop amounts, so remembering that the f-stop figure represents a fraction, f/2.8 is one stop wider than f/4. It lets twice as much light in. This differentiation only becomes important if when you reduce the aperture by one stop, you know that you have to make the equivalent adjustment to shutter speed or ISO to compensate in terms of a perfectly exposed image.
What is the Effect of Aperture?
Broadly, opening the aperture up lets more light in and reduces the depth of field. However reduction of the depth of field becomes less noticeable to the eye, the further the subject is away from the camera.
Depth of Field

Depth of field is defined as the area in a photograph that is acceptably sharp. The area of pin sharpness is defined in a narrow plane and the image becomes more blurry in front of and behind that area of critical sharpness, gradually at a rate defined by the distance away from the subject, the focal length and the f-stop.
This “sliding window” is a characteristic of depth of field that is often omitted in photography tutorials, with the result we simply think in terms of shallow and deep depths of field regardless of lens, but we can see it clearly in this table where the near and far points of “acceptably sharp” are listed for different focal lengths and apertures.
| Focal Length | Subject Distance (m) | f/1.4 | f/2.8 | f/4 | f/16 |
| 35mm | 0.25 | near 0.25, far 0.25 | near 0.25, far 0.25 | near 0.24, far 0.26 | near 0.23, far 0.27 |
| 5 | near 4.27, far 6.04 | near 3.72, far 7.63 | near 3.36, far 9.75 | near 1.7, far Infinity | |
| 50 | near 18.29, far Infinity | near 11.19, far Infinity | near 8.47, far Infinity | near 2.43, far Infinity | |
| 100 | near 22.38, far Infinity | near 12.6, far Infinity | near 9.25, far Infinity | near 2.49, far Infinity | |
| 200mm | 5 | near 4.97, far 5.03 | near 4.95, far 5.05 | near 4.93, far 5.07 | near 4.73, far 5.31 |
| 50 | near 47.49, far 52.79 | near 45.22, far 55.92 | near 43.49, far 58.80 | near 31.28, far 124.54 | |
| 100 | near 90.41, far 111.86 | near 82.51, far 126.91 | near 76.93, far 142.83 | near 45.47, far Infinity | |
| 300mm | 5 | near 4.99, far 5.01 | near 4.98, far 5.02 | near 4.97, far 5.03 | near 4.88, far 5.13 |
| 50 | near 48.85, far 51.2 | near 47.76, far 52.46 | near 47.21, far 53.14 | near 39.51, far 68.07 | |
| 100 | near 95.5, far 104.94 | near 91.4, far 110.39 | near 88.25, far 115.36 | near 65.25, far 213.93 |
You can see clearly in this table, the reason the 70-200mm lens is so popular in landscape photography and >300mm in wildlife photography. The wider lens (35mm) diminishes the size of objects in the background whereas the longer lens (200mm) compresses the foreground making distant objects appear closer and correspondingly larger in the frame.
In pursuit of sharpness front to back over large distances, landscape photographers need to develop an understanding not only of aperture but of hyperfocal distance – the area defined as the closest point of acceptably sharp focus to the horizon with any given lens. My article Simplifying Hyperfocal Distance goes into this in some detail.
Macro Photography

As can be inferred from the table above, macro lenses, focused at very short distances would offer a very shallow depth of field. In fact the formula used to calculate the distances above do not hold for macro lenses as they are manufactured to deliver images at 1/1 ratio to the sensor.
Depth of field with macro lenses does depend on focusing distance, but typical values at a distance delivering 1:1 ratio images are:
| Lens | f/4 | f/8 | f/16 | f/22 |
| 100mm | 0.14mm | 0.56mm | 2.3mm | 4.3mm |
As can be seen, these are values so small that the concept of near and far sharp focus is barely viable.
Note that f-stops above f/16 in most lenses introduce diffraction into the equation which makes images appear soft at best.
Aperture in Landscape Photography
In landscape photography, using zoom lenses eg 70-200mm the necessity for sharpness immediately in front of the camera is less. Often the nearest object in the frame is a couple of metres away or even more. Instead we are usually preoccupied with sharpness leading to the horizon.

There is an exception to this.
Wide Angle Lenses

Wide angle lenses are popular in landscape photography for their wide field of view and naturally deep depth of field. This comes at the cost of diminishing the size of objects in the distance, however a popular way of turning this distortion to advantage is to utilise portrait orientation and have objects in the foreground provide the sense of depth in the image. This can require sharp focus closer than the couple of metres mentioned above.
| Lens | Subject Distance (m) | f/4 | f/8 | f/16 |
| 16mm | 0.5 | near 0.46, far 0.54 | near 0.34, far 0.92 | near 0.26, far 5.49 |
| 1 | near 0.68, far 1.86 | near 0.52, far 13.14 | near 0.35, far Infinity | |
| 2 | near 1.04, far 29.17 | near 0.7, far Infinity | near 0.42, far Infinity | |
| 3 | near 1.25, far Infinity | near 0.79, far Infinity | near 0.45, far Infinity |
Rules of Thumb
To take away the pain of calculating precise distances in the field, there are Rules of Thumb for mid range apertures between f8 and f/16 where focus point is not close to the lens.
1/3 of the Way
Focusing a third of the way into the frame is a rough guide that mostly gets by. It won’t work for longer distances and it won’t work for wide angle lenses, but for run of the mill, everyday shooting with nothing too close to the camera it mostly works fine.
Double the Distance
This is closely related to the hyperfocal distance theory. Choose the nearest thing you need to be in sharp focus and choose a focus point twice as far away. Works better than 1/3 of the way, the issue you are most likely to run into is losing focus nearer the camera. Set back one pace and try again.
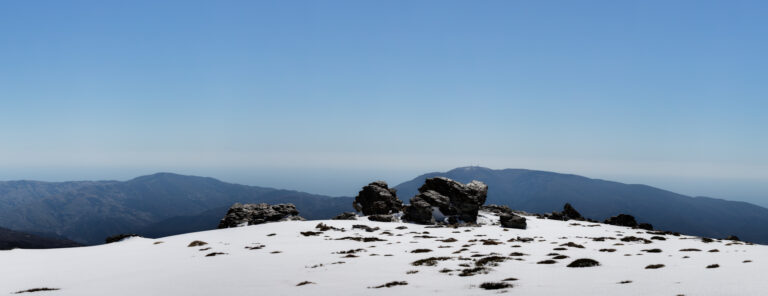
Focus on the Subject
With subjects like the one at the top of this article, where the subject needing sharp focus is more than a mile away, focus on the subject. Foreground is irrelevant as its so far away that focusing on the subject will almost certainly make it sharp in any case.
Photo Pills

Most of the values in these tables have been extracted from the PhotoPills app. I have no commercial relationship with the makers other than being a paying customer, but I unhesitatingly recommend this very affordable app. It comes in both IOS and Android flavours and contains calculators offering depth of field, exposure, field of view, hyperfocal distance as well as a Shoot Planner showing direction of sun and moon at any time of the day for any given point on the map, a sun table showing golden hour timing and blue hour timing, phases of the moon and much more. Its an invaluable tool for landscape photographers and should definitely find a place on your phone!
Conclusion
You don’t have to memorise the tables, but you do have to understand them. The different behaviour of macro, wide angle, and telephoto lenses is worth its weight in gold. In the field, take this understanding and apply it with the double the distance rule of thumb.
Armed with this knowledge you should be able to see your way to prioritising which of ISO, Aperture and Shutter Speed needs to be adjusted so that you get a good exposure that represents your artistic vision. There is another article on the subject of balancing ISO, Aperture and Shutter Speed with a view to achieving a perfect exposure: Mastering Aperture ISO and Shutter Speed