Using Luminosity Masks Effectively in Landscape Photography
Using Luminosity Masks effectively has been a game changer for many photographers, myself included, and I’m delighted to see them arrive in DxO PhotoLab 7 courtesy of DxO FilmPack 7. (You need to have both products installed for Luminosity Masks to become active in PhotoLab).
Before PhotoLab 7, Photoshop was the only option for Luminosity Masking and even then required a plugin. I use Greg Benz’s excellent Lumenzia. Between DxO and Adobe, Lumenzia is unquestionably the more powerful set of tools, so if you’re a Photoshop user, I’d thoroughly recommend Lumenzia.
But I’m getting ahead of myself. What are Luminosity Masks and why are they preferable to masks created using brushes or manual selections?
Table of Contents
What are Luminosity Masks
Masking in the processing stage of photography is a technique that allows the photographer to confine an adjustment to an area of an image. In Photoshop, these areas have been defined by creating a selection or brushing the effect onto the image.
Luminosity Masks allow an area to be selected using the brightness of the pixels. This opens up a whole new level of masking, allowing masks to be created that are more realistic and accurate.
Why are Luminosity Masks Preferable to Manual Masks?
When you create a mask manually, by making a selection or using a brush, you are working on all of the pixels within the boundaries of the selection. This is not entirely true of DxO’s Control Points, as they select pixels based on a very small sample, but the Control Point is not a luminosity mask, basing its selection on colour and tonality.
Luminosity masks are refinable – you can select very precise ranges of luminosity and refine them according to your requirements. A good example of this would be running water, you can select the whiter shades of water running over rocks and enhance those on their own to draw the viewer’s eye to the stream without clumsily selecting the entire stream. In other words, you can make existing whites whiter and darks darker with an accuracy that is simply not achievable manually.
What are the Use Cases for Luminosity Masks
A good example of a use case requiring luminosity masking would be selecting complex and irregular skylines or architectural details. TV Ariels, cables in cityscapes. In this, luminosity masks are way faster than any manual selection, and they don’t leave halos around the selection.
Landscape Photography: Skylines, Recovering Sky Colour, Running Water, Dodging and Burning Sunlight and Shadows
Urban Photography: Dodging & Burning Light and Shadow, Selecting overlit areas in night photography, Irregular architectural features
Real Estate & Event Photography: Correcting mixed lighting
Portrait Photography: Eyes and Teeth!
Luminosity Masks and Landscape Photography
Landscape and Urban photography are the areas where Luminosity Masking has made the most impact. Check out the fine art photography of Julia Anna Gospodarou or Joel Tjintjelaar for jaw droppingly brilliant black and white fine art photography that capitalists on the accuracy and flexibility of Luminosity Masking.
One of the reasons luminosity masks work so well in landscape photography is that the selection follows what you see. Luminosity masks enable you to bring out the details of a landscape in the way that you saw it, dark shadows and sunlight, without any halos or other unwelcome digital artefacts.

Ansel Adams and the Zone System
Although Ansel Adams didn’t invent the zone system or luminosity masking, his definition of the zone system for darkroom use has carried over into digital photography. The Zone system is where Luminosity Masks enable theory to meet practice in a digital world. Of course, Adams predated Digital by quite a few decades, but his system of assigning numbers from 0 through 10 to different brightness values or zones, with 0 representing black, 5 middle grey, and 10 pure white, is the essence of luminosity masks.
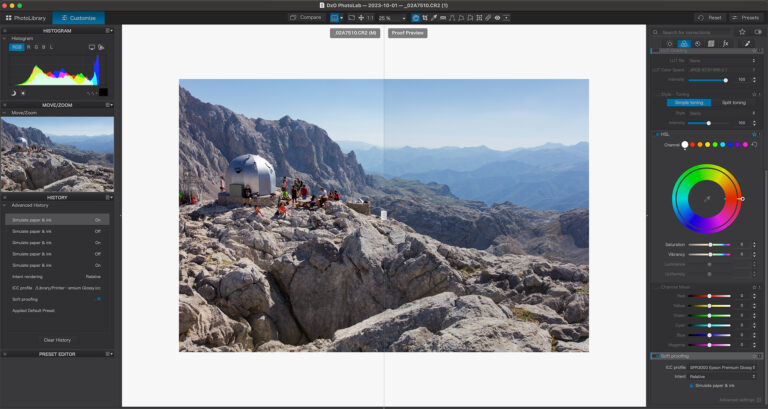
The problem that the zone system addresses is that light and shade are assessed as a single exposure to a camera. This results in photographs erring on the side of flatness until enhanced by software. In a nutshell, the zone system allows the photographer to assign different exposure levels to various parts of an image, making the blacks blacker and the whites whiter. In addition to having the photographer select luminosity values with the dropper tool, DxO PhotoLab allows a selection to be made on a grey scale, mirroring the Zone system.

In PhotoLab the final selection can be adjusted using the controls on the second row to reduce or expand the scope of the mask. In addition, the Eraser tool can be used to delete areas of the mask.
It’s important to note that while Luminosity Masks can be used to restore dynamic range, it is not an HDR technique. Luminosity masking is different to tone mapping (the technique that underpins HDR tools) and results in more subtle, lifelike edits.
Using Luminosity Masks Effectively
My intention with landscape photography is always to create landscape images that are founded in realism. I’m not a fan of extreme HDR, but that is a subjective choice, there is nothing wrong with HDR, it’s another tool in the toolbox, one that I occasionally use. To further realism, I always try to work with the light that is already there.
By this I mean paying attention to which way the light is falling in the image and use the tools to draw the eye to the subject of the image while keeping everything in line with nature.
Top Tip for Landscapes
In DxO PhotoLab I find it helpful to convert the image to black and white and work with the zone system to bring more finely tuned contrast into play. Once I make the image work in monochrome, in terms of contrast and depth, I convert it back to colour and fine tune the result.
Which Luminosity Masking Tool is Right for Me?
I have direct experience with three Luminosity Masking tools: DxO PhotoLab, Lumenzia and Raya Pro. DxO PhotoLab is the newest and the simplest to use, and the tool comes bundled with FilmPack 7.
For Photoshop, I chose Lumenzia over Raya Pro, but it was a very close thing; they were practically interchangeable. The reason I opted for Lumenzia in the end was that Jimmy McIntyre’s Raya Pro is not the only tool in his offerings that supports luminosity masks and that raised some concerns about ongoing support and future direction.
The tools have a significantly different way of doing things.
In PhotoLab, once the mask is refined and applied, you use a selection of tools that you are already familiar with, associated with the mask to apply edits. These tools appear directly below the mask panel in the software.
In Lumenzia, the tools bundled in the plugin are using Photoshop under the covers, the bundled tools are there to save time and keep the focus on the task at hand.
Ultimately, Lumenzia/Photoshop is a more powerful suite of tools, so my guidance is clear. If you already use Photoshop or plan to use Photoshop, then Lumenzia is the way to go. If you already use PhotoLab, you’ll find Luminosity masking much more intuitive. Simply install FilmPack 7, and Luminosity tools will be activated automatically in PhotoLab 7.
You can buy Lumenzia here
You can download trial versions of DxO Software (PhotoLab and FilmPack) here
You can buy DxO PhotoLab here
You can buy DxO FilmPack here
Check out the DxO PhotoLab 7 video series on YouTube.
Subscribe…
I’ll keep you in the loop with regular monthly updates on Workshops, Courses, Guides & Reviews.
Sign up here and get special prices on all courses and photowalks in 2024
I sometimes use affiliate links in our reviews and instructional material. If you purchase software or hardware through one of these links it won’t cost you any more, but it does help me to offset the costs of creating the content.
Thanks for your support!